How to use GPIO library in VB.net
this is a legacy library and thus not supported by Toradex anymore. We recommend that you use the new libraries for all Toradex modules. Please see the Toradex CE Libraries and Code Samples for up-to-date information.
This article aims to help the developer in using Toradex GPIO library in VB.Net. The following steps illustrate how to build a complete project which requires calling Toradex Win32 DLLs in VB.net.
The content of this article references the OLD API used for Toradex libraries. This version of the libraries only works on modules based on PXA and Tegra processors, the content does not apply to modules based on i.mx6 or Vybrid that use the NEW version of the APIs.
Hardware setup
This demo has been performed on Colibri Evaluation board V3.1A. To set up the development environment, connect SODIMM pin 135 on connector X10 to pin 2 (LED1) on connector X21.
Demo application
1. Follow this tutorial up to step 7 to create a new project in VB.net.
2. Add two buttons on the form and change their text to "ON" and "OFF". Instructions on how to edit the text on buttons can be found from step 8 to 10 here.
3. Add three Labels on the form and change their text to "Colibri Evaluation Board V3.1A", "SODIMM PIN 135" and "STATUS OFF".
4. The sequential process for this demo is:
- Import System.Runtime.InteropServices; is used for inter-operability services in VB.net, so that Toradex C Win32 DLLs can be used.
- DllImport is used to import the Toradex Win32 DLL for the project. This has to be called for every C function that will be used in the project.
- Every C function to be used in the project has to be declared preceded by Public Shared Sub (return type).
5. Right click on the form and click on View Code.
6. The edited code is as follows:
'/********************************************************
'Small Demo Application for the GPIO library.
'For an interface description see GPIOLib.h

'On the Colibri Evaluation Board V3.1A:
'Connect X10 pin 40 with X21 pin 1

'For information about compatibility refer
'Colibri modules migration guide.
'********************************************************/
Public Class Form1
    Private Sub FormLoad(ByVal sender As System.Object, ByVal e As System.EventArgs) Handles MyBase.Load
        GPIO.SetPinAltFn(135, -1, GPIO.DIR_OUT)   'Set SODIMM Pin 135 as Output'
        GPIO.SetPinLevel(135, True)               'Set default level HIGH'
    End Sub

    Private Sub Button1_Click(ByVal sender As System.Object, ByVal e As System.EventArgs) Handles Button1.Click
        GPIO.SetPinLevel(135, True)
        Label3.Text = "STATUS                     ON"
    End Sub

    Private Sub Button2_Click(ByVal sender As System.Object, ByVal e As System.EventArgs) Handles Button2.Click
        GPIO.SetPinLevel(135, False)
        Label3.Text = "STATUS                     OFF"
    End Sub
End Class
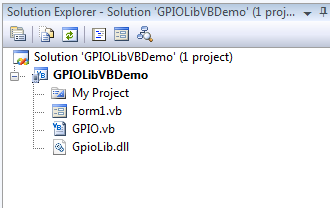
7. Add GpioLib.dll into project by choosing Add > Existing item.. from solution properties.
8. Make a file GPIO.vb under project and copy the following code
Imports System.Runtime.InteropServices
Public Class GPIO

    Public Const DIR_IN = 0
    Public Const DIR_OUT = 1
    Public Const EDGE_RISING = 1
    Public Const EDGE_FALLING = 2
    Public Const EDGE_BOTH = 3
    Public Const TYPE_PXA270 = 17
    Public Const TYPE_PXA320 = 2
    Public Const TYPE_PXA300 = 8

    <DllImport("GPIOLib.dll")> Public Shared Sub InitGPIOLib()
    End Sub
    <DllImport("GPIOLib.dll")> Public Shared Sub DeInitGPIOLib()
    End Sub
    <DllImport("GPIOLib.dll")> Public Shared Function GetProzessorID() As Integer
    End Function
    <DllImport("GPIOLib.dll")> Public Shared Function GetGPIODir(ByVal gpioNum As Integer) As Integer
    End Function
    <DllImport("GPIOLib.dll")> Public Shared Function GetPinDir(ByVal pinNum As Integer) As Integer
    End Function
    <DllImport("GPIOLib.dll")> Public Shared Sub SetGPIODir(ByVal gpioNum As Integer, ByVal dirOut As Boolean)
    End Sub
    <DllImport("GPIOLib.dll")> Public Shared Sub SetPinDir(ByVal pinNum As Integer, ByVal dirOut As Boolean)
    End Sub
    <DllImport("GPIOLib.dll")> Public Shared Function GetGPIOAltFn(ByVal gpioNum As Integer) As Integer
    End Function
    <DllImport("GPIOLib.dll")> Public Shared Function GetPinAltFn(ByVal pinNum As Integer) As Integer
    End Function
    <DllImport("GPIOLib.dll")> Public Shared Sub SetGPIOAltFn(ByVal gpioNum As Integer, ByVal altFn As Integer, ByVal dirOut As Boolean)
    End Sub
    <DllImport("GPIOLib.dll")> Public Shared Sub SetPinAltFn(ByVal pinNum As Integer, ByVal altFn As Integer, ByVal dirOut As Boolean)
    End Sub
    <DllImport("GPIOLib.dll")> Public Shared Function GetGPIOLevel(ByVal gpioNum As Integer) As Boolean
    End Function
    <DllImport("GPIOLib.dll")> Public Shared Function GetPinLevel(ByVal pinNum As Integer) As Boolean
    End Function
    <DllImport("GPIOLib.dll")> Public Shared Sub SetGPIOLevel(ByVal gpioNum As Integer, ByVal val As Integer)
    End Sub
    <DllImport("GPIOLib.dll")> Public Shared Sub SetPinLevel(ByVal pinNum As Integer, ByVal val As Integer)
    End Sub
    <DllImport("GPIOLib.dll")> Public Shared Function GetGPIOEdgeDetect(ByVal gpioNum As Integer) As Integer
    End Function
    <DllImport("GPIOLib.dll")> Public Shared Sub SetGPIOEdgeDetect(ByVal gpioNum As Integer, ByVal edge As Integer)
    End Sub
    <DllImport("GPIOLib.dll")> Public Shared Function GetGPIOEdgeStatus(ByVal gpioNum As Integer) As Integer
    End Function
    <DllImport("GPIOLib.dll")> Public Shared Sub ClearGPIOEdgeStatus(ByVal gpioNum As Integer)
    End Sub
End Class
10. Download and Install .NET Compact Framework directly to the FlashDisk of the device from here.
11. Navigate to Solution Explorer in visual studio > Right Click on Solution > Properties > Devices.
12. Uncheck "Deploy the Latest version of the .NET Compact Framework (including Service Packs)".
13. To deploy GpioLib.dll alongwith project executable, right click on GpioLib.dll > Properties and set Copy to Output Directory to Copy always. Alternatively, you can manually copy the dll to the project folder in which .exe will be deployed after step 14.
14. To build and deploy the project, follow steps 12 to 16 from here.
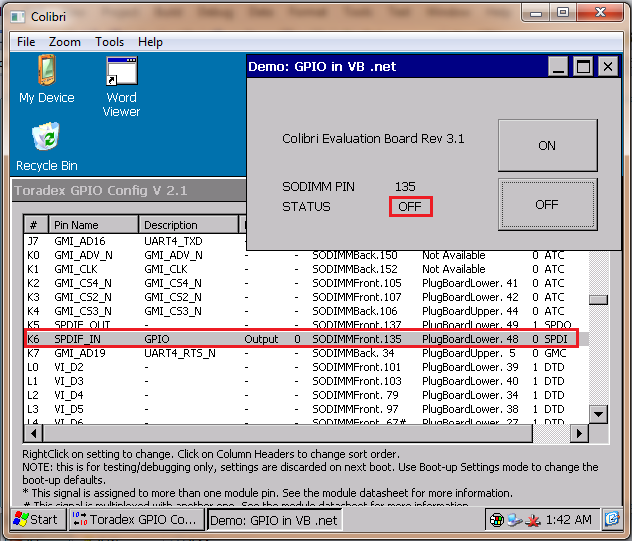
Once the program is running, clicking on ON which will turn on the LED1 on Colibri Evaluation board V3.1A. The corresponding change in the pin state can be seen through GPIOConfig tool as well.

Clicking on OFF will turn off LED1. Corresponding change can be seen below
Download project
You can download demo source code from here.