Microsoft Silverlight under Windows CE 6.0 R3
If you are using the Colibri T20, we recommend to use Windows Compact 7 becuase there are lot of improvements in Microsoft Silverlight.
Windows CE 6.0 R3 provides the exciting features of Silverlight for Windows Embedded. Silverlight for Windows Embedded is a native (C++ based) user interface (UI) development framework for Windows Embedded CE powered devices and is based on Microsoft Silverlight 2. With this technology, the UI of an application can be described using XAML, an XML-based language, and can be designed using visual tools like Expression Blend. This allows UI designers to work on embedded devices using the same tools, they use on the desktop and it lets embedded developers concentrate on the core application features and not on the design of the UI.
This article covers basic information about the setup of a Silverlight Application to run on a WinCE 6.0 R3 OS.
- Developing OS and Application in Microsoft Visual Studio 2005 and Platform Builder
- Creating Visual Application in Microsoft Expression Blend 2 SP 1
Basic information about Silverlight Application Development can be found on the Microsoft development Homepage.
http://msdn.microsoft.com/en-us/library/cc838158%28v=vs.95%29.aspx
http://msdn.microsoft.com/en-us/silverlight/bb187401.aspx
http://msdn.microsoft.com/en-us/library/ee503558.aspx
The Differences Between Silverlight for the Web and Silverlight for Windows Embedded can be found on the Microsoft development website.
http://msdn.microsoft.com/en-us/library/ee501848.aspx
Step by Step instructions for a sample Application can be found at:
http://geekswithblogs.net/WindowsEmbeddedCookbook/archive/2009/10/01/silverlight-for-embedded-tutorial.aspx
http://msdn.microsoft.com/en-us/library/ee502779.aspx
http://geekswithblogs.net/WindowsEmbeddedCookbook/category/10787.aspx
Requirements and Environmental Setup, Adding Silverlight to OS Design in Visual Studio
1. Include the components needed to support Silverlight for Windows Embedded inside your OS Image in the Platform Builder and Sysgen.
2. Discover easiest way to Sysgen and create nk.bin in Release mode.
3. Develop Silverlight Application in Debug mode.
http://discovertheexperience.blogspot.com/2009/09/windows-embedded-ce-60-r3-using.html
Working on the Silverlight Application
The workprocess on the Application is devided in two parts:
- A new Subproject you add to the OS design where code and resource files are developed.
- A new Expression Blend project where you develop the graphical aspects of your Application.
Further Details can be found in the Step by Step instructions mentioned earlier.
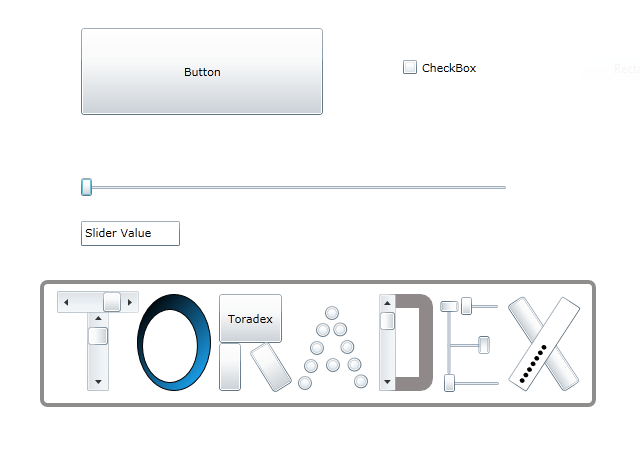
Toradex Example for Silverlight
The Toradex Example contains some basic elements which Expression Blend provides. Besides Visual demonstration the C++ code behind the sample application demonstrates some simple functions. By pressing the big button you can change the state of the check Box. Changing the state of the slider shows the actual value in the Textbox below. Beneath the functional elements there are some more UI elements without further function.
The example can be downloaded here https://files.toradex.cn/Colibri/WinCE/SourceCode/SilverlightSample.zip
To integrate the Toradex Sample project place the SilverlightSample as unzipped folder in your Design(for example D:\WINCE600\PBWorkspaces\Toradex_000_Core\RelDir\Colibri__ARMV4I_Debug\Silverlightsample). Browse to the SilverlightSample.pbpxml file in Visual studio when adding it to your OS Design as an Existing Subproject.

XAML Code of the Toradex Silverlight Sample
In the following you can see the basic XAML code for the interactive elements. XAML is the XML-based markup language created with Expression Blend. As a tag based language it is easy to read and similar to known web languages. It has to be added to the Subproject manually as shown in the Step by Step tutorials mentioned above.
<UserControl
	xmlns       ="http://schemas.microsoft.com/winfx/2006/xaml/presentation"
	xmlns:x     ="http://schemas.microsoft.com/winfx/2006/xaml"
	x:Class     ="SimpleApp.Page"
	Width       ="640"
	Height      ="480"
	xmlns:d     ="http://schemas.microsoft.com/expression/blend/2008"
	xmlns:mc    ="http://schemas.openxmlformats.org/markup-compatibility/2006"
	mc:Ignorable="d">

	<Grid
		x:Name      ="LayoutRoot"
		Background  ="White">

		<Button
			x:Name="MyButton"
			Content="Change CheckBox State"
			Height="87"
			Margin="82,33.5,316,0"
			VerticalAlignment="Top"/>
		<Slider
			x:Name="MySlider"
			Height="26"
			Margin="82,179.5,128,0"
			VerticalAlignment="Top"/>
		<CheckBox
			x:Name="MyCheck"
			Content="CheckBox"
			Height="19"
			Width="163"
			Margin="0,64.5,74,0"
			VerticalAlignment="Top"
			HorizontalAlignment="Right"/>
		<TextBox
			x:Name="MyBox"
			Text="Slider Value"
			Width="99"
			Margin="82,227,0,228"
			HorizontalAlignment="Left"
			TextWrapping="Wrap"/>
		...
		In the Toradex sample, you can find further code here for the Toradex letters below the functional elements in the sample.
		...
	</Grid>
</UserControl>
C++ code of the Toradex Silverlight Sample
In the following passage, you can see the event handlers out of the .cpp file of the Toradex Silverlight Sample where changes of the state of the button and the slider are processed.
...

class BtnEventHandler
{

public:

	HRESULT OnClick(IXRDependencyObject* source,XRMouseButtonEventArgs* args)
	{
		//MessageBox(NULL,TEXT("You pushed the Button"),TEXT("Silverlight for Embedded test"),MB_OK);
		XRThreeState Value;
		box->GetIsChecked(&Value);
		if (Value == XRThreeState_Unchecked)
			Value = XRThreeState_Checked;
		else
			Value = XRThreeState_Unchecked;
		box->SetIsChecked(Value);
		return S_OK;
	}
};

class SldEventHandler
{

public:

	HRESULT OnSlide(IXRDependencyObject* source,XRValueChangedEventArgs<float>* args)
	{
		LPWSTR strVal = new WCHAR[32];
		wsprintf(strVal,TEXT("%.2f"),args->NewValue);
		txt->SetText(strVal);
		MessageBeep(0xFFFFFFFF);
		delete strVal;
		//MessageBox(NULL,strVal,TEXT("Slider Value"),MB_OK);
		return S_OK;

	}
};
In this part of the C++ code, it gets visible, how to get the Application directed to the elements of the XAML code. To connect the event handlers to active elements, delegates are needed, they aren't smart pointers so they have to be released explicitly.
...
	       IXRCheckBoxPtr box;

	if (FAILED(retcode=root->FindName(TEXT("MyCheck"), &box)))
	{
		NKDbgPrintfW(TEXT("FindName MyCheck failed"));
		return -1;
	}

	       IXRTextBoxPtr txt;

	if (FAILED(retcode=root->FindName(TEXT("MyBox"), &txt)))
	{
		NKDbgPrintfW(TEXT("FindName MyBox failed"));
		return -1;
	}

	IXRSliderPtr sld;

	if (FAILED(retcode=root->FindName(TEXT("MySlider"), &sld)))
		return -1;

	IXRDelegate<XRValueChangedEventArgs<float>>* valueChangeDelegate;

	SldEventHandler gigu;

	if (FAILED(retcode=CreateDelegate(&gigu,&SldEventHandler::OnSlide,&valueChangeDelegate)))
		return -1;

	if (FAILED(retcode=sld->AddValueChangedEventHandler(valueChangeDelegate)))
		return -1;

	IXRButtonBasePtr btn;

	if (FAILED(retcode=root->FindName(TEXT("MyButton"), &btn)))
		return -1;

	IXRDelegate<XRMouseButtonEventArgs>* clickdelegate;

	BtnEventHandler handler;

	if (FAILED(retcode=CreateDelegate(&handler,&BtnEventHandler::OnClick,&clickdelegate)))
		return -1;

	if (FAILED(retcode=btn->AddClickEventHandler(clickdelegate)))
		return -1;
...
Sources Script of the Toradex sample
In the subproject, there are directories included and the libraries need to support Silverlight for Windows Embedded inside our application. To see that, open the subproject sources script by right clicking on the subproject and choosing "open".
	...

	TARGETLIBS= \
	   $(_PROJECTROOT)\cesysgen\sdk\lib\$(_CPUINDPATH)\coredll.lib \
	   $(_PROJECTROOT)\cesysgen\sdk\lib\$(_CPUINDPATH)\xamlruntime.lib \
	   $(_PROJECTROOT)\cesysgen\sdk\lib\$(_CPUINDPATH)\uuid.lib \

	...
Run Application on WinCE 6.0 R3
After importing the Sample as Subproject build the Subproject. It has been discovered that we should better build the Application in Debug mode. After building, move the created SilverlightSample.exe file from ...\SilverlightSample\obj\ARMV4I\debug to the Platform running WinCE 6.0 R3 and launch the program.