Debugging with JTAG
Introduction
In this article you will learn how to use the JTAG port to debug applications running in Cortex-M cores available in some of our modules.
Overview
JTAG is a dedicated debug port which allows hardware assisted software debugging or to recovering flash content. Colibri and all Apalis modules provide the JTAG signals through pads on the bottom of the PCB. The Colibri Evaluation Board v3.1 and later as well as the Apalis Evaluation Board come with pogo pins connecting to the JTAG pads of the module PCB. JTAG is then provided by a standard 20-pin connector (ARM JTAG 20) on the evaluation board.
On PXA based modules JTAG is the only recovery mechanism (supported by the Toradex utility Colibri Loader).
Modules powered by NVIDIA Tegra, NXP/Freescale i.MX6/7 or Vybrid SoC provide an internal boot ROM with various recovery capabilities. We recommend making use of the SoC's boot ROM for recovery instead of using JTAG.
- Txx Recovery Mode
- VFxx Recovery Mode
- Recovery using Toradex Easy Installer
i.MX 7 based Modules
Toradex tested some debug adapters for the secondary Cortex-M4 core. The ARM KEIL ULINKpro D debug adapter in combination with ARM DS-5 and ARM MDK development environment has proven to be working. Also, Segger J-Link has been successfully used to debug the Cortex-M4 core. See also the following resources:
- Getting started with Arm DS-5 and (Colibri) i.MX7
- Using ARM DS-5 IDE with Cortex-M4 of a Colibri iMX7
- First steps with Heterogeneous Multicore Processing on the NXP i.MX 7 (with Segger J-Link)
To use JTAG to debug the primary A7 cores running Linux some additional kernel parameters are necessary:
setenv defargs ${defargs} clk_ignore_unused nohz=off nohlt
Tegra T20 based Modules
While we recommend using a Lauterbach one can actually also get it running with low-cost equipment as outlined below. There are two options to debug the T20 CPU.
Both options require first disabling the CPU watchdog.
Black Magic Probe
BMP is an Open Source firmware that can run on different hardware platforms. The BMP team offers their own hardware platform which supports JTAG and SWD. It can also run on ST-Link V2 programming/SWD adapters which only supports SWD. There are also STM32 development board which have a debugger on-board and can be obtained as cheap as €15 at your favourite online retailer. It suffices to flash the correct BMP firmware onto the ST-Link V2 portion of an the STM32 development board.
The BMP provides a GDB server on a usb2serial console. Using it is as easy as attaching gdb to the devices and saying:
monitor swdp_scan and then attach 1.
Pro: really easy to use, no configuration required, the hardware is identified automatically.
Contra: BMP is developed for microcontroller debugging. Debugging a Cortex-A9 is beyond its scope but it actually mostly works. Dual-core debugging is not possible. Either compile the kernel without SMP, or you will see two targets when swdp-scanning, and you can only attach to one. Despite this, you can at least partially debug e.g. the Linux kernel. Bootloader debugging works as well, as U-Boot only uses one core.
OpenOCD
The other option is to use OpenOCD with e.g. the Olimex ARM-USB-OCD-H in combination with ARM-JTAG-SWD. This setup also uses SWD. So far directly using JTAG with (only) the ARM-USB-OCD-H seems not possible.
Pro: Dual-core debugging is possible; many of the advanced features of OpenOCD can be used.
Contra: Complex configuration required. OpenOCD usage in itself is quite complex.
To reduce the latter a little bit, please find the full configuration file attached. For the given hardware setup (ARM-USB-OCD-H + ARM-JTAG-SWD), it should be used in this way:
openocd -f interface/ftdi/olimex-arm-usb-ocd-h.cfg -f interface/ftdi/olimex-arm-jtag-swd.cfg -f openocd-tegra2.cfg
One can happily use this to debug the Linux kernel and the U-Boot boot loader.
Tegra K1 based Modules
Toradex tested Lauterbach jtag solution with TK1. By default TK1's JTAG will be in boundary scan mode, to enter JTAG mode SoC needs to be restarted with TRST_N pulled low. It can be accomplished with this trace32 commands and board reset:
SYStem.CPU TEGRAK1
DIAG 0x3404 1
More information on debugging TK1 can be found here (external blog site).
Vybrid based Modules
Toradex tested some debug adapters for the secondary Cortex-M4 core (Colibri VF61). The ARM KEIL ULINKpro D debug adapter in combination with ARM DS-5 development environment has proven to be working.
Our partner AntMicro documented how to use OpenOCD on Linux. OpenOCD supports various JTAG debug adapters such as the Amontec JTAGkey-tiny, Olimex ARM-USB-OCD or Olimex ARM-USB-TINY-H.
Note: On Colibri VF61 the JTAG pin JTMS is also used by the on module audio codec. When the operating system (WinCE or Linux) is started, this pin is muxed for audio codec communication use, hence the JTAG connection will break! On Linux, the kernel must be compiled without the audio SoC machine driver (CONFIG_SND_SOC_FSL_SAI_WM9712) and the pin muxing for sai2 must be disabled as described below:
diff --git a/arch/arm/boot/dts/vf610-colibri.dtsi b/arch/arm/boot/dts/vf610-colibri.dtsi
index a8d59f7..ebfb27d 100644
--- a/arch/arm/boot/dts/vf610-colibri.dtsi
+++ b/arch/arm/boot/dts/vf610-colibri.dtsi
@@ -18,7 +18,7 @@
        reg = <0x80000000 0x10000000>;
    };

-   sound {
+   /*sound {
compatible = "fsl,fsl-sai-audio-wm9712";
fsl,ac97-controller = <&sai2>;

@@ -30,7 +30,7 @@
            "LINEINL", "LineIn",
    "LINEINR", "LineIn",
    "MIC1", "Mic";
-   };
+   };*/
};

&nfc {
@@ -45,6 +45,8 @@
status = "okay";
};

+
+/*
&sai2 {
    compatible = "fsl,vf610-sai-ac97";
#sound-dai-cells = <0>;
@@ -59,6 +61,7 @@
      &gpio0 13 GPIO_ACTIVE_HIGH>;
status = "okay";
};
+*/

&iomuxc {
vf610-colibri {
Colibri PXA Modules
Supported JTAG adapters:
- Olimex ARM-USB-OCD (not the ARM-USB-OCD-H !)
- Amontec JTAGkey-Tiny (currently not available for purchase anymore)
Colibri Evaluation Board V3.1
Connect your JTAG adapter to X13 of the Colibri Evaluation Board V3.1. Make sure that pin 1 of the connector connects to pin 1 of your JTAG adapter.
Colibri Evaluation Board V2.1
On the Colibri Colibri Evaluation Board V2.1 provides a JTAG interface on connector X13. The Amontec JTAGkey-Tiny pin 1 matches to the Evalboard V2.1 X13 pin 1.
For more information about the JTAG pin out see also the Evaluation Board Schematic.
Please note that Amontec JTAGkey-Tiny may not available for purchase anymore. Another option is the Olimex ARM-USB-OCD (not the ARM-USB-OCD-H !)
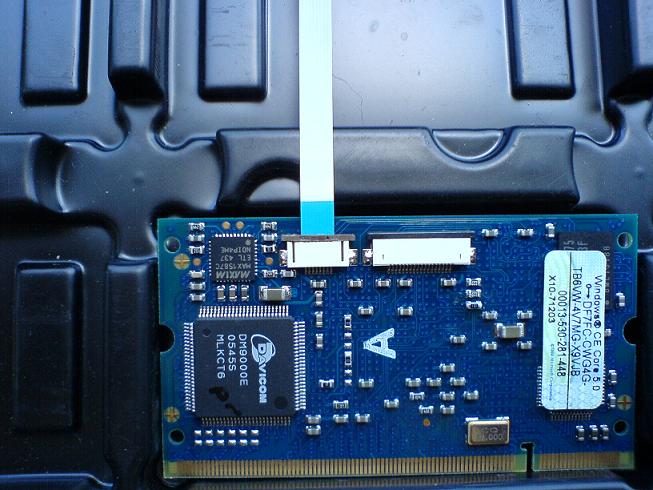
How to Connect the JTAG FFC Cable
The two pictures below explain how to connect the cable to the Colibri Evaluation Board V2.1.

Purchase Replacement FFC Cables
The JTAG FFC cable is a standard part available at all major electronics distributors. The main parameters are:
- FFC
- 0.5mm pitch
- contacts on the same side (Type A)
For example the MOLEX 98266-0083
Here are some example sources:
Driver Installation
Windows 10: General Note
Windows 10 does not allow to install the drivers for Amontec and Olimex JTAG adapters, because the drivers are not properly signed. To overcome this issue you need to restart Windows 10 following the procedure described below:
- Press the Windows [START] button.
- Type "startup". Select [Change advanced startup settings].
- Select [Restart now] under the Advanced startup area.
- Select [Troubleshoot].
- Select [Advanced Options].
- Select [Startup Options].
- Select [Restart]. Your system will restart and present a text-based menu.
- Select option 7 on your keyboard to choose "Disable driver signing enforcement".
Drivers for Amontec JTAG Key Tiny
We found problems when installing the originally linked drivers from the Amontec page under Windows 7.
Here is a link to a set of drivers which worked fine (July 13, 2011):
http://www.seabrooks.plus.com/jworker/AmontecDriverInstallWin7.pdf
Drivers for Olimex ARM-USB-OCD
Drivers for the Olimex-ARM-USB-OCD can be downloaded from the ColibriLoader download folder.
On some systems, there seem to be wrong drivers installed automatically. ColibriLoader will throw an error message, that no supported JTAG adapter was found. Please follow the steps below to recover from this issue:
- Go to the Windows device manager
- Right-click the libusb/Olimex device, select Update Driver Software...
- select Browse my Computer for Driver Software
- select Let me Pick from a List
- click on [Have Disk], navigate to the folder CDM 2.08.24 Driver for Olimex
- Select USB Serial Converter A or USB Serial Converter B
- Repeat Steps 2 to 6 for the 2nd libusb/Olimex device