Getting Started with AWS IoT Greengrass for Torizon
Overview
As a participant of the AWS Partner Network, Toradex offers products qualified under the the AWS Device Qualification Program (DQP). See the current Toradex products under the DQP in the AWS Partner Device Catalog.
This article introduces the first steps to run AWS IoT Greengrass software in Toradex modules with Torizon. There are two options to run AWS IoT Greengrass software:
- Option 1: Run AWS IoT Greengrass in a Docker container
- Option 2: Install AWS IoT Greengrass using Yocto
The simplest way to implement AWS IoT Greengrass is by using Docker containers. However, this approach offers some limitations. According to the AWS IoT Greengrass documentation:
The following features aren't supported when you run AWS IoT Greengrass in a Docker container:
- Connectors, except the IoT SiteWise connector and Greengrass Docker application deployment connector.
- Local device and volume resources. Your user-defined Lambda functions that run in the Docker container must access devices and volumes on the core directly.
These features aren't supported when the Lambda runtime environment for the Greengrass group is set to No container, which is required to run AWS IoT Greengrass in a Docker container.
In this article, we demonstrate both options.
Prerequisites
- Toradex Sytem on Module (SoM) with Torizon installed.
- Follow Torizon Quick Start Guide
- An Amazon Web Services (AWS) account. If you don't have one, see Create an AWS Account.
- To use an AWS Region that supports AWS IoT Greengrass. For the list of supported regions for AWS IoT Greengrass, see AWS Regions and Endpoints in the AWS General Reference.
- Core device certificate and cryptographic keys. If this is your first contact with AWS IoT Greengrass, the next sections explain how to generate it.
Recommended Workflow to Get Started with AWS Greengrass IoT and Toradex modules
If this is your first time with AWS IoT Greengrass, we recommend you to read the AWS IoT Greengrass Getting Started pages together with this article, in the following sequence:
Skip Module 1 from the AWS IoT Greengrass Getting Started page.
Read the Module 2: Configure AWS IoT Greengrass on AWS IoT to understand how to generate and download the file containing the Core device certificate and cryptographic keys. The required file containing the certificates and keys is in the format
<hash-setup>.tar.gz(for example,c6973960cc-setup.tar.gz). This file is necessary to setup AWS IoT Greengrass on Toradex modules.
The Core device certificate and cryptographic keys files are required to install AWS Greengrass properly on a IoT module.
Install AWS IoT Greengrass in a Toradex Module following the instructions contained in this page.
After installing the AWS IoT Greengrass in a Toradex Module, resume the reading of the AWS IoT Greengrass Getting Started instructions from the Module 3 (part 2): Lambda functions on AWS IoT Greengrass onwards.
Installing Option 1: Running AWS IoT Greengrass in a Docker container
Configure the Lambda function for Torizon in AWS Greengrass console
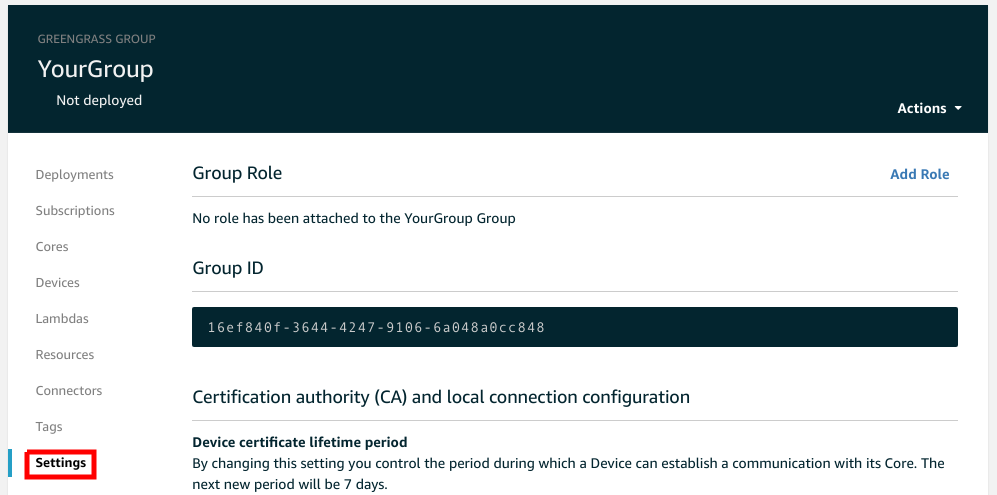
First, we need to configure the Lambda Function for AWS IoT Greengrass to run in a Torizon container. To do this, go to the settings of your Greengrasss Group:

Select the option Default Lamda function containerization to No container and click the button Update default Lambda execution configuration:

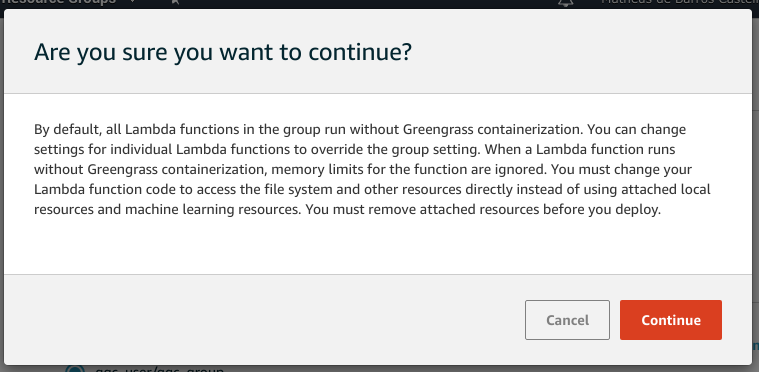
A confirmation window will be shown, click the Continue button:

Download docker-compose to Run AWS Greengrass Software for Torizon
Step 1 - Copy the security resources file
After setting up the AWS IoT Greengrass on your AWS IoT and after you download the security resources, copy the security resources file to the board via ssh:
$ scp hash-setup.tar.gz torizon@board_ip:/home/torizon
From the above command example, remember to change board_ip to your Toradex module IP address.
Step 2 - Access the board terminal
Access the board Bash via ssh:
$ ssh torizon@board_ip
Unzip the security resources file:
# sudo tar -xzvf hash-setup.tar.gz
Step 3 - Obtain the docker-compose
To obtain the docker-compose.yml required, you can simply copy the file found in our samples repository here.
Copy docker-compose file in the same root directory where you unzipped the security resources files on the target Torizon device.
Step 4 - Execute the docker-compose
Execute the docker-compose file to run the container with the AWS IoT Greengrass Core software for Torizon:
# docker-compose run --rm greengrass
You should have output containing the following message:
More message logs may be output with this message.
Greengrass successfully started with PID
The message above means the AWS IoT Greengrass Core software for Torizon is running successfully.
Test AWS IoT Greengrass example
Resume the reading of the AWS IoT Greengrass Getting Started instructions from the Module 3 (part 2): Lambda functions on AWS IoT Greengrass onwards to execute a lambda function on the Toradex module.
Installing Option 2: Install AWS IoT Greengrass using Yocto
As mentioned earlier, to have access to all the features from AWS IoT Greengrass, you need to run it outside a container. Therefore, you need to add the software to your Linux image by re-building it using Yocto. This procedure shows how to add it to the TorizonCore image. The same procedure can be applied to the Toradex BSP based on poky with minor changes.
This procedure was tested with TorizonCore version 4.0.0 and Zeus release of Yocto.
Step 1: Building the Linux image for the first time
First, set up your Linux PC and build the Linux image for the board following Build TorizonCore With Yocto article. You don't need to modify the image at this time, just build it for the first time, so we can be sure the image builds successfully before to proceed to add new layers.
In our example, build-torizon is the building directory. The structure of the image source directory after the first build is the following:
tree -L 1
.
├── bitbake
├── build-torizon
├── downloads
├── layers
├── setup-environment -> layers/meta-toradex-torizon/scripts/setup-environment
└── sstate-cache
Step 2: Add AWS IoT Greengrass layer
In the BSP source directory change to the layers directory and git clone the meta-aws layer:
$ cd <path-to>/layers
$ git clone https://github.com/aws/meta-aws
Change to the meta-aws directory and checkout to the latest version in the zeus branch.
$ cd meta-aws
$ git fetch --tags
$ git checkout zeus
Change to your build directory and add the meta-aws layer:
$ cd <path-to>/build-torizon
$ bitbake-layers add-layer ../layers/meta-aws>
Check if the layer is present in BBLAYERS in the bblayers.conf file.
After this, add the greengrass recipe to your image.
$ cd <path-to>/build-torizon
$ echo 'IMAGE_INSTALL_append += " greengrass"' >> conf/local.conf
Step 3: Setting up the AWS IoT Greengrass installation
Some additional changes to the meta-aws layer are required. To build the image with these changes using Yocto, we create a new layer. Change to the build directory, create and add a new layer called meta-iot:
$ cd <path-to>/build-torizon
$ bitbake-layers create-layer ../layers/meta-iot
$ bitbake-layers add-layer ../layers/meta-iot>
Remove the `recipes-example directory:
$ rm -rf <path-to>/layers/meta-iot/recipes-example/
Create a new recipe directory, with another directory within:
$ mkdir -p <path-to>/layers/meta-iot/recipes-core/aws
Install the root CA, core device certificate and keys
As explained in the previous sections, the Core device certificate and cryptographic keys files are required to install AWS Greengrass properly on a Toradex module.
First, cp the <hash-setup>.tar.gz file to the newly created directory:
$ cp `<path-to>/<hash-setup>.tar.gz` <path-to>/layers/meta-iot/recipes-core/aws
In the <path-to>/layers/meta-iot/recipes-core/aws directory, create a bbappend file with the following content:
RDEPENDS_greengrass_remove = "openjdk-8"

FILESEXTRAPATHS_prepend := "${THISDIR}"
SRC_URI_append = " file://<hash-setup>.tar.gz"

do_install_append() {
install -d ${D}/${BPN}/certs/
install -d ${D}/${BPN}/config/
install -m 0644 ${WORKDIR}/certs/* ${D}/${BPN}/certs/
install -m 0644 ${WORKDIR}/config/* ${D}/${BPN}/config/
}
Replace <hash-setup>.tar.gz by your certificate and key file name. Also, update the SRC_URI[md5sum] variable with the md5sum of your file.
Also, note that AWS IoT Greengrass requires openjdk-8 to execute Java lambdas. Our example executes lambdas written in Python. Hence you need to remove Java 8 dependency from greengrass recipe, using the same .bbappend to build it.
The final structure of the meta-iot directory is:
$ tree
.
├── conf
│  └── layer.conf
├── COPYING.MIT
├── README
└── recipes-core
└── aws
├── <hash-setup>.tar.gz
└── greengrass_%.bbappend
Re-build and flash image
Use bitbake <image-name> to start a new build, following the Build TorizonCore With Yocto article. Use Toradex Easy Installer to flash the new image on the module
Execute AWS IoT Greengrass
After flashing the image and rebooting the module, the /greengrass/ggc/packages/1.10.1/bin/daemon daemon should automatically start. To check if the daemon is running, in your board's terminal, use the following command to check if the daemon is running:
# ps aux | grep -E' greengrass.*daemon'
Test AWS IoT Greengrass example
Resume the reading of the AWS IoT Greengrass Getting Started instructions from the Module 3 (part 2): Lambda functions on AWS IoT Greengrass onwards to execute a lambda function on the Toradex module.